SUP087 – Purchase Order Approvals

Overview
The Purchase Order Approval Function allows for you to create a Purchase Order workflow authorisation function across the business to manage the related spend per Vendor as well as to set specific limits per Employee /Approver.
Setup
Function Activation
To activate the Purchase Order Approval function, access the Company Options function and the Payables / Settings tab, activating the feature and setting the default User Document Limits and Vendor Monthly Limits. Note that once this feature has been activated, you will be unable to create a Purchase Order without first converting it from a Purchase Quote.

Assign User and Vendor Limits
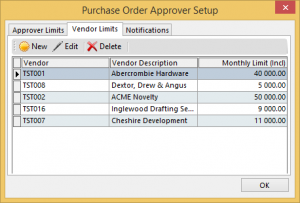
In the Accounts Payable Module, Maintenance Section select the Purchase Order Approver Icon. Here we will assign the various approvers, together with their Document Limit as well as the automated notification method.

You can also assign monthly Vendor limits to manage the spend on a per vendor basis. Should no limit be set then the Vendor will be afforded an unlimited monthly spend.
You can also setup default notification messages for the Email and/or SMS alerts.

Processing
Creating a Purchase Requisition
When you create a purchase Requisition you will need to select the relevant approver. Note that this will only display the relevant approvers based on their requisite Document Limit.

Approving a Purchase Requisition
On selecting the Purchase Order Approvals function each user will be presented with a list of Purchase Requisitions awaiting their approval.

Once you select a document you will be presented with the option to either Accept or Decline the document. On approval the Purchase Requisition will be converted to a Purchase Order.

Declining a Purchase Requisition
Should you decline a Purchase Requisition you will be able to set a Decline Reason code on the Purchase Requisition using the standard Authorisation reason codes.

SUP108 – Delivery Cost Pricing & Courier Integration

The purpose of this feature is to allow you to charge customers delivery charges based on Item Weights, Volumetric Weights, Number of Units, Fixed Price or Distance to Client. This can be used for personal company deliveries or used to recover costs of 3rd party courier companies. In addition, you can automatically integrate the sales documents to your Courier Company to Create Waybills, eliminating the need for manual capture, improving accuracy and expediting the delivery process from hours to seconds.
Setup
Create Delivery Methods
To create delivery methods, go to the Warehouse Module and select the Delivery Method option. In the screen below you will see that you can actually have multiple delivery methods in one. Once you have selected the service item to invoice you will then select the Billing Method. The billing methods are:
- Fixed Rate – this is one set weight for the order regardless of the size
- Total Mass – this is based on the order mass and is governed by a minimum fee as well as the ability to create a sliding scale table
- Volumetric Weight – this is the item volumetric weight and is governed by a minimum fee as well as the ability to create a sliding scale table
- Greater of Total Mass or Volumetric Weight – this is the greater of the previous 2 options, and is governed by a minimum fee as well as the ability to create a sliding scale table
- Order Units – this is based on the quantity of items order and is also governed by a minimum fee as well as the ability to create a sliding scale table
- Distance to Client – this is based on the distance to the client as set on the Customer delivery address and is governed by a minimum fee as well as the ability to create a sliding scale table.

Rate Table Settings
The rate table setting can either be set as a Fixed Cost for the rate, or as a Variable cost per Mass.
- Fixed Cost Option – this will assume a fixed cost for all deliveries that weigh within the weight range. In the table above, an order weighing 19kg will cost 9.25.
- Variable Cost Per Mass Option – this will assume a cost per weight for all deliveries that weigh within the weight range. In the table above, an order weighing 19kg will cost 175.75 (19 x 9.25).
Customer Setup
You now need to set a default Delivery Method to the Customer as seen below. For more detail you can also set this on a per Customer per Delivery Address basis.

Inventory Item Weight Setup
In order to use the weights it is critical that you setup the item weights on the Inventory Masterfile as depicted below.

Courier Integration Setup
To setup the switching of the sales document information to your Courier company, you need to select the related Account integration details as setup with your courier company either at Sales Order or Sales Invoice level.

Processing
Now that you have setup the delivery methods you will now proceed processing a sales document. In the example below you will see that we have selected the Weight button with the Weight details appearing on a separate screen alongside for greater detail.

Select the Delivery cost button will allow the user to adjust the delivery costs as required. Using our same rate table above with the weight of our Items you will see that the total delivery cost as calculated at 113.25kg x 8.90 / kg = 1,007.93.
SUP201 – Multi-Level Inventory Categories
Overview
We have added another 2 levels of Item Category (to 3) in order to facilitate the Inventory Search and reporting functions in the Palladium Enterprise and Palladium Premium editions. This function is available on all Inventory search functions throughout the application and has also been added to the offline PoS module that is available in the Palladium Enterprise Edition only.
Processing
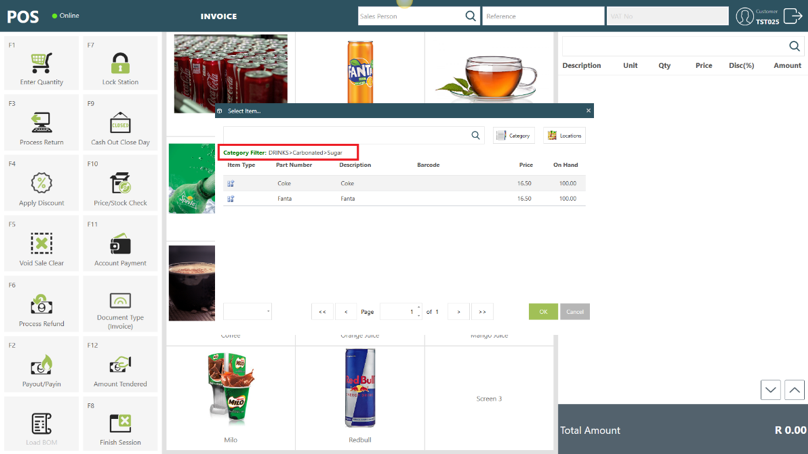
From a processing point of view, you can simply select the category selection below and the system will cascade your selections right down to the last level. Not all levels are mandatory giving the flexibility for you to only see the levels that are optimal for your business.

This functionality has also been incorporated into the Point of Sale and new Offline Point of Sale modules.
Reporting
All these additional fields have been added to the Business Intelligence cubes, allowing you to slice and dice the data as required. You can also start to compare your sales mix across years or months. using a dimension for say bottle size would allow you to view your sales mix of 340ml vs 500ml at a glance.

SUP034 – Automatic Credit Note Allocation

How Does This Feature Help Your Business?
- Accurate credit allocations.
- Offsets the credit immediately, this eliminates the process to have to manually apply the credit to the Sales Invoice.
- Saves you time.
Feature Setup

Feature Functionality


SUP103 – Fixed Assets
The Palladium Fixed Assets module allows you to manage 2 very distinct features. Firstly it allows you to manage and control your assets as required by legislation with the ability to process up to 5 depreciation calculations (commonly known as Asset Registers) per asset. Secondly, you can record all costs against your Assets, record the Usage per asset for a period, then run Efficiency reports per asset.
Setting Up the Assets Module
Before you start processing you need to first Setup the Assets Module. To do this you go to the Assets Module, in the maintenance section.

Creating Locations
The create location function allows you to assign locations to assets and transfer items across locations. This also facilitates the Asset count function.
Disposal Reasons
These reason codes could be Sold or Scrapped and assist in analysing your reasons for disposal.
Expense Types
These expense types relate to the recording of costs against an asset in order to assess the efficiency levels of an asset. This could be fuel costs in Litre or Service Fees etc.
Depreciation Methods
The depreciation methods are the different methods you use to depreciate your asset. These methods include:
- Straight line method
- Equal Allowance Method
- Reducing Balance Method
- Immediate Write off Method
- No Depreciation Method
- Variable % Method – this method will allow you to define the number of years over which to write down the asset with custom-defined percentages set per year (as seen in the screen below)

Asset Types
The Asset Types, or Groups is the way in which the respective assets are maintained in the Ledger Accounts as well as their common methods of depreciation.
We also cater for up to 5 different Depreciation Methods per asset each with the facility to report per Method, or Asset Register. Note that the Asset Registers (Depreciation Methods) can have their own custom name settings that can be found in the Control Panel >> Options >> Naming Conventions.
The Other Ledger Accounts such as, Asset Cost and Repairs & Maintenance are used during the Vendor Invoice Process function when Purchasing and allocating costs to assets.

Asset Master
This section contains all the information related to the individual Assets, split into the various tabs below.
General Tab
This tab contains all the General Information relating to the asset itself.

Purchase Information
This section allows you to set information such as the Purchase information as well as residual values that get used during the depreciation calculation. You can also revalue the assets at any time that will adjust the Depreciable Value dynamically.

Depreciation History
This section allows you to set the opening depreciation per Asset Register, as well as list and allow you to edit the various depreciation runs as seen below. Note that you can process a depreciation run 365 times a year if required.

Repairs and Maintenance
This feature allows you to capture Costs as well as records usage against the various Assets. This allows you to not only control costs, but you can also generate Asset Efficiency reports such as Km/L or Cost per Unit produced for machinery used in production.

Palladium also facilitates the ability to post these costs directly to the Assets from the Vendor processing screens below with the system Displaying all Assets linked to that specific Repairs and Maintenance Account that is used in the Asset Category setup.

Disposals
You can dispose of assets using Disposal reason codes for ease of reporting and analysis.

SUP045 – Add Value Invoices
This feature allows you to apportion addition costs to a specific batch of received goods. This could be used to assign costs such as Shipping or other transport costs or to apportion import duties for Additional Costs.
How Does This Feature Help Your Business?
This facility allows you to apportion other direct costs to a specific shipment, ensuring that you reflect a correct Cost Of Sales and Gross Profit margins.
This apportionment is applied as an accrual, alleviating the need to have the original Shipping cost invoices at hand.
Feature Option
Select The Original Supplier Invoice
In order to apportion costs to a specific batch of Received Goods, you first have to select the supplier invoice to which the additional costs will be apportioned. You can do this by selecting the Supplier Invoice and Select the Additional Cost option.

Apply Costs
Once you have selected the Landed Cost Adjustment option, the system will display all the Relevant Inventory items on the Supplier Invoice. Here you enter the value with which you would like to apply to the Shipment, and the system will then give you the option to apportion these costs to the Delivery apportioned either by total shipment quantity or by value with the option to apply the apportionment manually. You also have the option to adjust the Additional Costs Control account.

Post Supplier Invoice
When you post the Vendors invoice, you would post this against the control account as shown above. It is recommended that a Cost Of Sale Account be used as a control account in order to ensure that all costs are accounted for appropriately.
Note – We also recommend that this account is reconciled monthly to ensure the accuracy of postings, as the account balance should invariably be Nil.
Download the PDF for this Support DocumentSUP035 – Sales Discount Matrix
How Does This Feature Help Your Business?
- Eliminates erroneous or unauthorised discount entries.
- Allows you to logically group factors that result in price adjustments.
- Secure, since access to edit discount rates may be granted to specified users only.
Feature Setup

Feature Functionality


SUP036 – Credit Note Authorisation
How Does This Feature Help Your Business?
- It adds an additional security step for returns or a state where warranties and/or the condition of goods can be checked before credits are passed.
- It offers additional security for management to assist in reducing theft and fraud in an organisation.
Feature Setup
The ability to allow for Credit Return Requests is set through the Company Options Setup Function.

Feature Functionality


